What is a version control system and why do we need it.
Whenever we are working on any file on a computer (be it imagery, document or text) that will be modified iteratively, it may be difficult to keep track of each version of the file. Most of us would save each version of the file with a different name, usually the name of the file with a version number, or a version code, appended at the end of it. Some of us, frustrated as we are at the time, may even append other things to the end. Phrases such as “FINAL PLS” and “FinalFinalFinal” may be one of the things we are guilty of appending. Would it be nice to not have to do that?
That is where a version control system comes in. It allows us to essentially record every change to a file, or even a whole project. This makes it easy to revert to any previous version of the file whenever we want, compare changes between two versions of the same file, and it even allows us to know who modified a particular file and when.
Git, the version control system I use.
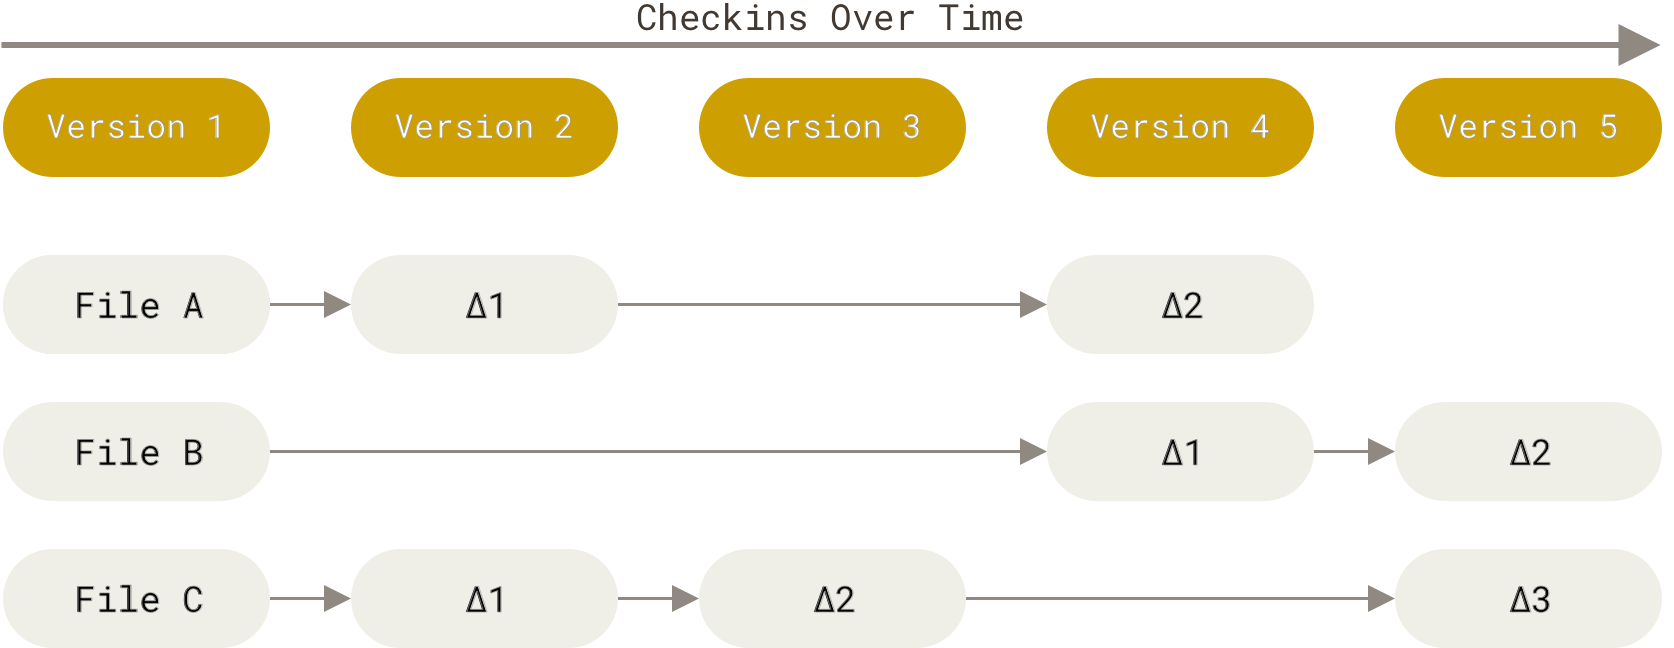
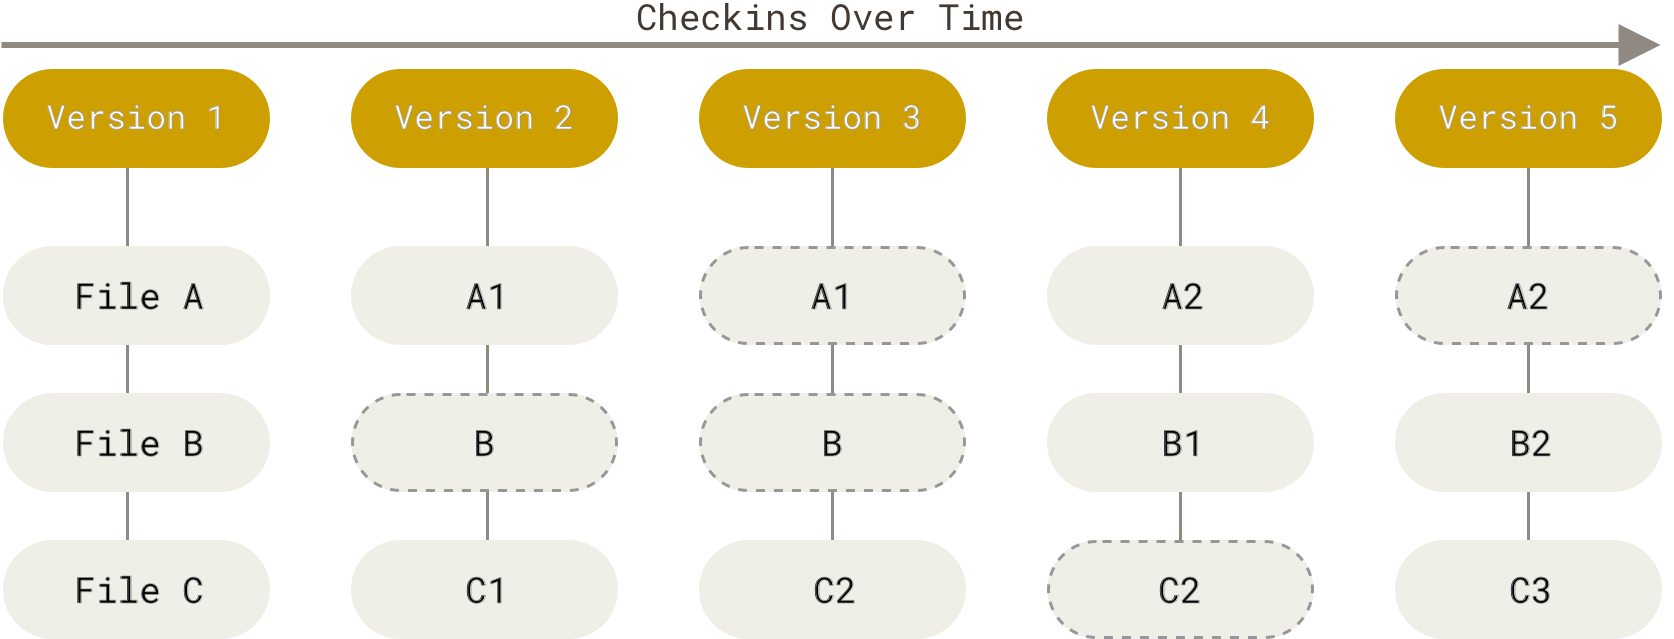
There are many version control systems out there, but what I am going to mainly talk about is Git, which is what I use. Git is a version control system that was originally developed by Linus Torvalds (If you don’t know who he is, he’s the guy that created the Linux operating system kernel). It is different from other version control systems in that, while other version control systems such as Bazaar, CVS, Perforce and Subversion stores information as a list of file-based changes (this way of storing changes to a file is called the delta-based version control), Git stores data in snapshots.
Whenever you commit a file, Git takes a snapshot of that file only if the file has changed. If it hasn’t changed, Git will just provide a link to the previous identical snapshot that has been taken before.
Git also differs from other Version Control Systems in that it has a distributed architecture. This means that Git will store the full information of the changes to a file with every developer’s cloned copy of the file. This means that even though a developer is not linked to the online version of the repository, they can still work on the file and commit it locally.
Git Basic Commands
These are usually the commands that you will use regularly. If you type in ‘git’ on the command line after you’ve installed it you will see all the basic commands that you can do and a short description of it.
- Git Pull
- Fetch from and integrate with another repository or a local branch
- Git Push
- Update remote refs along with associated objects
- Git Clone
- Clone a repository into a new directory
- Git Merge
- Join two or more development histories together
- Git Rebase
- Reapply commits on top of another base tip
- Git Revert
- Revert some existing commits
- Git Stash
- Stash the changes in a dirty working directory away
- Git Remote
- Manage set of tracked repositories
- Git Checkout
- Switch branches or restore working tree files
- Git Branch
- List, create, or delete branches
So far, I’ve only used a few of these commands, namely:
- Git Push. We (in this case me and my teammates) push our commits whenever we have implemented the required features for each push. According to our git flow (explained below) we have Red, Green and Blue commits with specific requirements as to what should be committed on those commits.
- Git Stash. I specifically use this whenever I want to work on a different branch, while I have uncommitted changes on the branch that I am previously working on. Using this command, I was able to stash them first, work on another branch, and come back to the branch that I have stashed, and continue the work that I did previously. I believe I am the only one that uses this command in my team.
- Git Pull. We use this command whenever we (also in this case me and my teammates) want to access the latest commit of any given branch. One of the cases that we use this is when we want to branch from the staging branch to create the PBI branch. It is ideal to branch from the latest commit of the staging branch so that there will be no problems when merging.
- Git Merge. We (again, me and my teammates) use this command to merge the PBI branch with the staging branch, and the task branch with the PBI branch.
- Git Branch. My teammates use this command to create branches, but there is actually an alternative to this that I use.
- Git Checkout. This is used primarily to change the branch that is worked on. In addition to that, I use the git checkout -b “name of branch” command to create a branch and automatically switch the branch that I’m working on to that branch.
- Git Remote. I use this once at the beginning to check whether or not the remote repositories that I am pushing to are the correct ones.
Git Flow
Whenever we are developing collaboratively on a large project, it is best to use a standardized git flow. These are usually different from company to company, so I will tell you what I used in class.
There are five types of branches that we will create and use.
- Master Branch: The branch that will host the code that is going to be deployed.
- Staging Branch: The branch that will store the code that is going to be presented in the sprint review
- Feature Branch/ PBI Branch: The branch that will host the code that is needed to implement a Product Backlog Item
- Hotfix Branch: The branch that will store code that is meant to fix bugs on the master branch. When it is ready it will be merged to the master branch.
- Coldfix Branch: The branch that will be used to store code whenever we want to perform a rollback

This is the git flow that we used:
a. Initialize master and staging branch.
At the start of the project, the master and the staging branch will be initialized first. Since we are only granted developer status, we cannot simply make changes to the master branch because it’s protected. This will be done by our maintainer whenever the code in our staging branch is good enough to be deployed to production.
The purpose of creating a master and a staging branch is to separate production code, which is put on the master branch with non production code, which is put on the staging branch. Production code is code that is ready to be deployed into the real world, which in our case, would be a server where the client can access and create schedules (our app is an automatic schedule generator). If we have set up auto-deployment to the client’s server, it will be dangerous if we deploy non-production code into the server, as it will interfere with the activities that the client does with the app. Sure with an app that is not as complex as ours we can ask the client to not use the app for a set period of time, but this is inconvenient, and an increase in downtime may not be acceptable if the client has deadlines to fulfill.
b. Initialize PBI branch
Whenever we want to finish a Product Backlog Item, this is the branch that we are going to use. Each PBI is developed using only one main branch, with sub-branches created as needed.
The purpose of creating a PBI branch, in addition to the master and staging, is to ensure that each feature is developed separately from one another. This will prevent any mishaps at first when two separate features has code that is put on the same file. The developers can make sure the features that they make work on the separate branch, then merge them when they are ready.
For us it also frees up the pipeline more quickly, since there are jobs that are only done on staging. One of the jobs is the deployment into the staging environment. It is very inconvenient when a developer has to wait for the deployment into staging job to finish, which can take a long time, for the pipeline to run the tests. Not developing on the staging branch makes it so that the automatic CI/CD feature does not run the job which frees the pipeline for other, more important tasks.
x. Use the Test Driven Development approach when developing
There are three types of commits that we have to create when developing the code needed to finish a PBI (not counting the chores commits)
- Red: Implementation of unit tests
- Green: Implementation of code that solves the unit tests
- Blue: Implementation of code that is refactored
The purposes of the unit tests is to verify that individual features work as intended before the code is merged into a separate branch. Then when the code is merged, the test cases verify that the feature still works. Sometimes when we merge code, we may forget that some parts of the code is needed for the feature to work, and we accidentally remove it due to it conflicting with code from the target branch (which may change if someone else has merged the branch that they have worked on into the the target branch). Test cases remind us of this and makes sure that we do not forget to make every single feature work as intended.
c and d. Merging the PBI branch with the staging branch
Whenever we want to merge a PBI branch with the staging branch, we need to create a merge request. We are not allowed to merge a PBI branch with another PBI branch. At this stage we are also inclined to review the code. It is done by developers that are not developing code for that particular PBI.
The code
e, f, g and h. Adjustment of code on the staging branch so that it is accepted and merged to the master branch.
If our code is rejected for any reason when our code is reviewed on the day of the sprint review, we have to revert the code to the previous version before the PBI is implemented. A coldfix branch will be created for this purpose.
A better Git Flow for our use.
Git flows are usually customized according to the needs of the companies that choose to adopt them. This is why there is no single best git flow. I will now tell you a git flow that is better suited to our needs.
The git flow that I designed is based on these beliefs:
- There is something that even code reviewers may miss after reviewing the code and approving it.
- Integration of multiple components may cause unintentional code smells that needs to be fixed.
- Advanced refactoring and improvements that cannot be expressed in user stories, for example refactoring by integrating a new framework into the code base, sometimes needs to be done.
- The red-green-refactor, while a good way to do commits, does not promote saving often to a shared repository, and is too rigid for our use.
To solve this, problem, I’ve added one more type of branch to the git flow that we currently use, which is the improvements branch. The improvements branch is added in as an implementation of belief #1, #2 and #3. Within this branch, we can implement frameworks that could make our code better, refactor code smells that appear unintentionally due to integration with multiple components and/or miss and other improvements that is not represented on the PBI. This branch must be developed with caution as to not destroy the implementation that we have created for past completed PBIs.
For belief #4, I suggest converting it to a [skeleton]-red-[yellow]-green-refactor commits, and a chores commit.
The [Skeleton] Commit
The skeleton commit is due to the fact that in our case, especially for front end, we usually plan the container/ class structure beforehand. This is consistent with what we have done in the past in our Programming Classes, where we are presented with a skeleton of the code with TODOs on them, and the integration of class diagram planning which we learned in our software development class to our workflow. By directly coding and committing the skeleton of the code that is created based on the class diagram that we have created, we can quicken the speed of the pushing of the first commit. This is not implemented in the coldfix branch as on that branch we are simply rolling back as shown on our class’ git flow illustration.
The [Red] Commit
The red commit is for the tests. The tests become easier to write due to us at least knowing the base structure of what we are going to create.
The [Yellow] Commit
The yellow commit is the “anything goes” commit. Oftentimes when we are developing something, we found a better way to implement it mid way. This may result in us having to remake the component/class and the tests so that the feature is implemented with the the best way that we know of. There are also cases where the feature that we need to implement may not be able to be implemented over the course of one work day, or we need to move someplace else to work.
This method of the commit allows us to commit when we want to stop working at any given point and continue later, and also replaces the “mini-waterfall” contract that the strict red-green commit introduces. This is also an optional commit; if the developer manages to go to green without the existence of a yellow commit, then the developer need not intentionally create a yellow commit just so that the commit will be perfectly skeleton-red-yellow-green-refactor.
The [Green] Commit
The green commit is pretty straightforward. It is done when all tests have passed locally.
The [Refactor] Commit
The refactor commit is also pretty straightforward. It is used only when the features that we need to implement for the feature branch is already done and strictly for refactoring. Like the yellow commit, this is also optional.
The [Chores] Commit
The chores commit is a commit which can be implemented before or after the commits that I have mentioned before. The contents of this commit should strictly be code modifications that does not relate to the feature i.e. non functional commits. Commits that does things like modifying the CI/CD code, or the incorporation of changes from one branch to another branch (which I will talk about a bit further) are categorized with this tag.
The Incorporation of Changes from One Branch to Another Branch
Whenever we are trying to incorporate change, there are two things that we can do: we use the Merge command, or we use the Rebase command. There is a big difference between these two, which I will elaborate to you now.
The Merge Command
The Merge Command is written like this:
git merge [Branch Target] [Branch Source]

The upsides of it is that it is a non-destructive option. Every change can be represented, or all the commits can be combined (using –squash, the recommended way to combine commits), into a single merge commit, which is what happened in the above illustration.
The downside of this is that the logs can be hard to read and understand if there are lots of changes involved, which contributes to the development time of the project. Below is an example of a cluttered commit history.
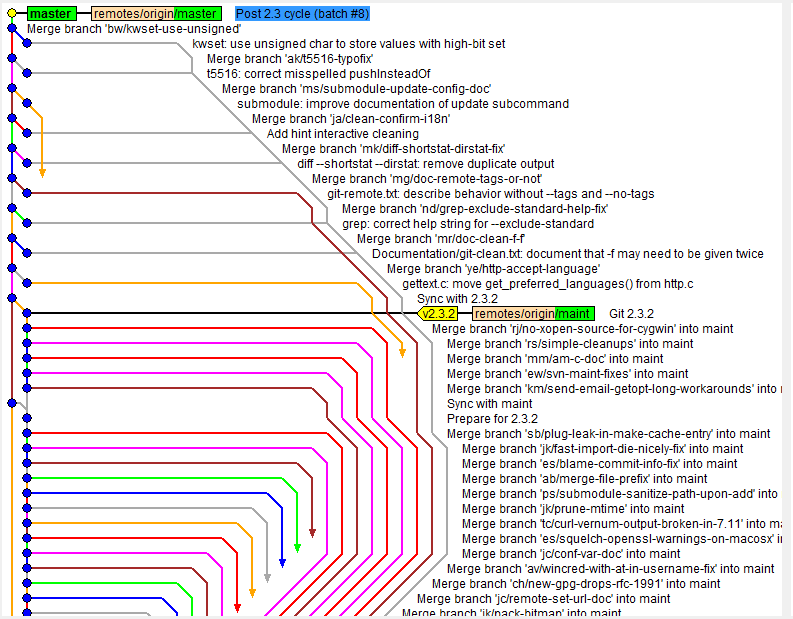
What I noticed from the above commits is that every single change, however miniscule that is, is represented by a single branch, which increases the number of merges that needs to be done. This is why I created the Improvements Branch solution, with the purpose to represent all non-functional related changes with a single branch, while feature-related changes are represented by the respective feature branches, which minimizes branching due to miniscule changes in code.
The Rebase Command
The rebase command is used like this:
git checkout [Source Branch]
git rebase [Target Branch]
It changes the history of the commits by adding the entire [Source Branch] into the [Target Branch] to create a linear history. This effectively applies all changes that has happened in the [Target Branch] into the commits that the [Source Branch] has. This results in a cleaner and linear project history, which eases the viewing of it through the use of git log.
However, this comes with two trade-offs: Safety and Traceability. It is potentially dangerous to the collaboration workflow as the implementation of target branch changes to the source branch commits may destroy the implementation that your teammate has done locally, and you lose the context of the merge commit which effectively removes the ability to know when changes are incorporated into the branch.
Since the disadvantages of the Merge Command can be mitigated with clever use of branching and merging, and the Rebase disadvantages is, I feel, detrimental to a collaborative work environment, I advocate the use of the Merge Command in this case.
Also, Gitlab has added a neat feature, which is sort of like a GUI based merge command. In addition to the features of the merge command that I elaborated above, you mention people that should approve the merge request, and assign someone to complete the merge. Assignees can be empty if you want everyone to be allowed to merge. However for specific PBIs, the ones doing the PBI should be the assignees. If you are using Gitlab (we use Gitlab), this is what I recommend using.
The Rules of Commit and Commit Message
Ideally, each commit should only contain files that is modified and want to be committed onto the repository. There may be times when there is a change that is not ready to be committed. Instead of using only
git add .
Adding the files using a more specific approach, is better.
Commit messages should be descriptive, and succinct (no random strings such as hehe, commit, fix. Describe the fix that you did). One or Two sentence with a maximum of 60 characters should be enough for most commit messages and as stated before, [Tags] should be added to the message to describe what type of change is being implemented there. If there is a case where a commit message should be more detailed, use 60 characters as the title of the commit message on the first line, leave the second line blank, and use the third line as a body which describes the changes in detail.
How Versioning Will be Handled
We will use semantic versioning, which generally follows the template X.Y.Z, or in more detail:
v[Major].[Minor]-[Commit Number]-[Hash]
Major patch is incremented with every major release, Minor Change is incremented when there is feature added but deemed not enough to qualify for a Major Release.
Versioning will be implemented with Git Tags. This is because git has a neat feature which adds a hash and a commit number to each commit made after the version has been set. Git also has a search feature which helps locate tags with a particular pattern and a feature to tag old commits.
The alternative to that, branching, I feel, just adds unnecessary complexity to the logs.
Illustration
Here is the rough diagram for the git flow that I designed.

From top to bottom are branches named:
- Master Branch: The branch that will host the code that is going to be deployed.
- Staging Branch: The branch that will store the code that is going to be presented in the sprint review
- Feature Branch/ PBI Branch: The branch that will host the code that is needed to implement a Product Backlog Item. As expected, tags that are going to be used in this branch are all the tags that I mentioned above: Skeleton, Red, Yellow, Green, Refactor and Chores.
- Hotfix Branch: The branch that will store code that is meant to fix bugs on the master branch. When it is ready it will be merged to the master branch.
- Coldfix Branch: The branch that will be used to store code whenever we want to perform a rollback
- Improvements: To store small non-feature related changes to the code after the merging of features. This can include the modification in the CI/CD script, or refactoring after merging (which uses the [Chores] and [Refactor] tags).
As indicated above, there are version numbers that is attached to each commits to master, which follows the versioning standards that I have set. The commit number and hash is not illustrated due to the fact that it is auto-generated by git depending on the number of commits being done.
Conclusion
As I stated before, there is no single best git flow. This is just one of the many git flows that you can use, and if the git flows out there does not suit your needs, you could even make your own.
References:
https://hackernoon.com/git-merge-vs-rebase-whats-the-diff-76413c117333
